Olympus M Zuiko 40-150 f2.8 Pro Lens for Wildlife Photography
Why did I choose the Olympus 40-150 f2.8 Pro Lens?
Every so often we’ll encounter an optic which makes us gasp. We all have our favourite lenses and that will vary depending on our system and the things we shoot. Each lens will have its own character and that’s usually demonstrated by its handling of contrast, colour, the quality of out of focus areas, and of course sharpness. In fact sharpness is the one attribute which gets flogged to death in lens discussions and I will say that as a portrait photographer sharpness is not always top of my list. But in nature and sport photography sharpness is crucial – in this line of work we do need to show as much detail as possible in our subject and kit lenses won’t always cut the mustard.
As many of you will know over the last couple of years I’ve turned exclusively to Micro 4/3 cameras and lenses which I now use for all of my professional and personal work (bar the very rare occasions when I’m part of an event with Canon). There have been a number of reasons behind the switch – there is quite a lot of wear and tear on my muscles and joints and I suffer from RSI and a degree of arthritis. For that reason alone it was quite impossible for me to continue to carry large DSLR bodies and lenses. Downscaling to small lightweight equipment has been a lifesaver – and contrary to the many urban myths which circulate in photography forums, for most usage there isn’t a big trade-off in image quality or performance. I hear it said time and time again that Micro 4/3 is not for professionals because there is ‘too much depth of field’ at a given aperture and ‘too much noise’ compared to a modern full frame system. These statements are often made by people who have not used nor compared each system in real-world conditions. Because if they had, they would understand that the settings we use on a Micro 4/3 camera can be quite different to those we would choose on a full frame camera when photographing any given scene.
Take the photographs in this blog post for example. Historically I would’ve photographed these animals on my 5DMkIII (I still own a full range of up-to-date full frame equipment and I’ve had ample opportunity to make comparisons) using my Canon 70-300L and I would photograph animals mostly at f5.6 or f8. At higher magnifications the depth of field is still fairly shallow at these aperture values, and since animals are hugely variable in shape, we need to ensure that the key parts of our subject are in sharp focus. Attempting nature photography at a very wide aperture can be risky and would generally be reserved for certain subjects in more predictable or creative conditions. Anyway, using my micro thirds cameras I can achieve the same image (in terms of depth and field and noise) by simply shooting a couple of stops wider. That’s it really, this gives me an ‘equivalent’ image – same depth of field, and the same amount of noise. I can apply this principle to pretty much every shot I take, having spent my full frame life shooting location portraits and wildlife on a telephoto lens using fast zooms at apertures of around f4 to f8. These days I use fast micro four thirds zooms and a selection of wonderful Micro 4/3 prime lenses. So for me, there has been no perceptible compromise in quality – and I enjoy the many benefits of smallness.
Olympus M Zuiko 40 to 150 f2.8 Lens Field Review
A few months ago we saw Olympus release a wide to tele professional zoom lens which has now been followed by a fast tele zoom aimed at professional sports and nature photographers (this will no doubt appeal to portrait photographers as well). We know that the beauty of Micro 4/3 is the compact size and low weight, but we have to understand that long fast lenses with professional build quality simply cannot be small and light thanks to the laws of physics (but they will be more compact than their full frame counterparts). Nor will they be cheap. The lens under review here has a full metal construction and covers an 80-300 field of view (in 35mm terms) and maintains a constant fast f2.8 aperture. Yet I was pleasantly surprised when I saw that this lens was smaller and lighter than I was expecting. Once you put the large lens hood on it is a more imposing piece, and I daresay there are plenty of photographers who will like that. The build quality is simply stunning, as you would expect at the higher price points. But does it live up to the hype? Is it really as sharp as some of the early testers are saying? Well, Olympus kindly put one into my hands for the day yesterday at the British Wildlife Centre in Surrey and we had a fantastic time photographing the gorgeous animals who inhabit the reserve (one of which took a bit of a shine to Claire’s boots!).
If you want the full specifications of this lens there are plenty of formal review sites to visit. If you’re interested in test charts (which I never look at, because they can be unreliable much of the time and don’t always reflect field use) there are sites for that as well. The lens I used is a loan copy, it’s available for pre-order in the UK and should be released within the next few weeks. My reviews are based upon usage in the field, as I might use a given optic professionally. I’m looking at balance, weight, ease of handling, focus performance, contrast, sharpness, and overall quality. I was shooting using two cameras, my Olympus OMD EM10 and my EM1 since these are the bodies I use the most in my work. The photographs have had minimal processing, involving my usual curve adjustment. I have not added anything beyond the small amount of default sharpening which I set on export (around 0.3/35). I was shooting at ISO values between 1250 and 1600 (it’s winter here in the UK and light is in short supply). This is never ideal for lens testing, but I’ve been doing it long enough to tell good detail rendition from bad in a range of situations.
Incidentally, my review of the all-important teleconverter can be found here: Olympus MC14 Teleconverter Field Review
My findings, and my opinion of the lens is set out underneath the photographs.


Olympus M Zuiko 40-150 f2.8 Handling
The lens balances very well indeed, even on my little EM10 (which I use with the small accessory grip). It feels even better on the EM1. I had the camera and lens combo dangling around my body all day and I wasn’t particularly aware of the weight, nor did I grow tired whilst using it.
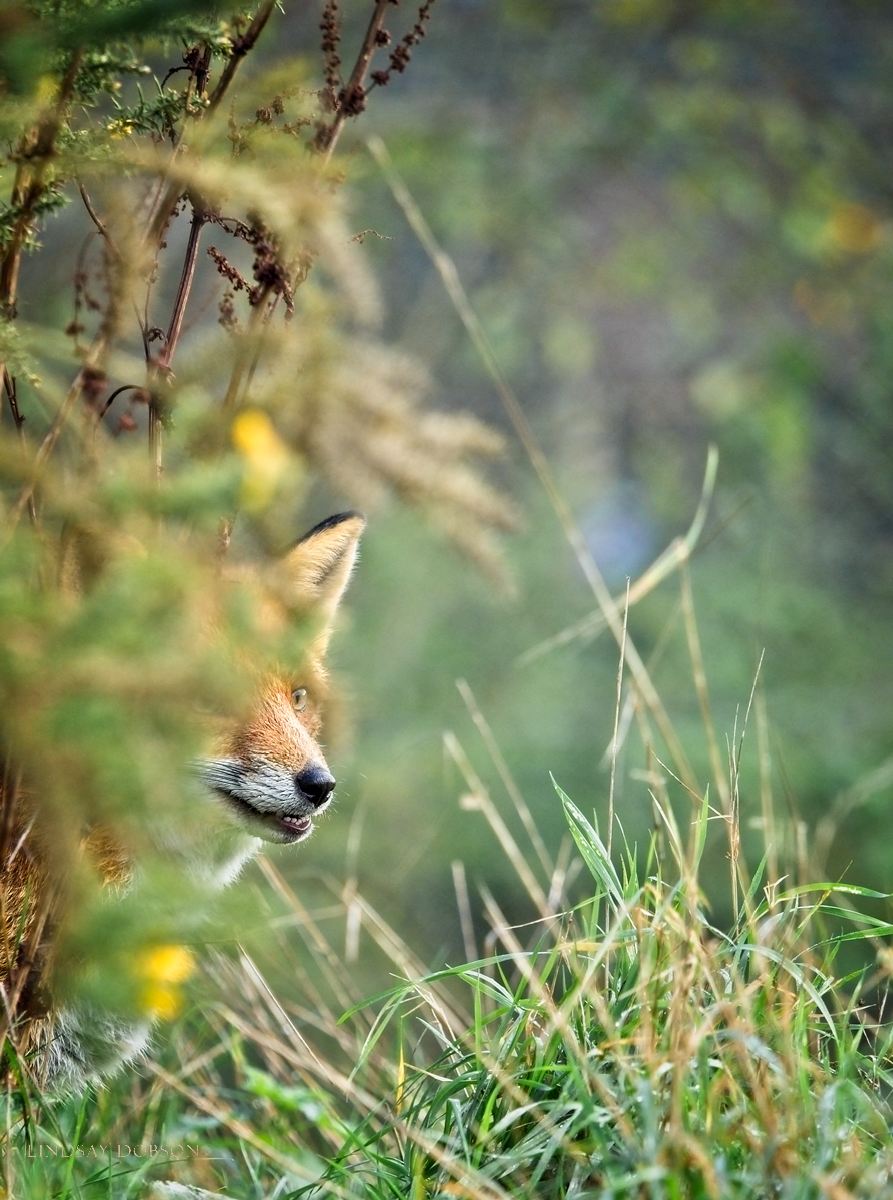
Olympus M Zuiko 40-150 f2.8 Background Separation
The tests carried out with this lens were all done at f2.8, which is like shooting a full frame camera at about f5.6 (if you shoot APS-C then the difference in depth of field between Micro 4/3 is quite minimal in practice). As you can see, my depth of field was extremely shallow, and I have to be very precise with my focus point on my subjects’ eyes.
Olympus M Zuiko 40-150 f2.8 Colour Rendering
Colour and contrast is superb.
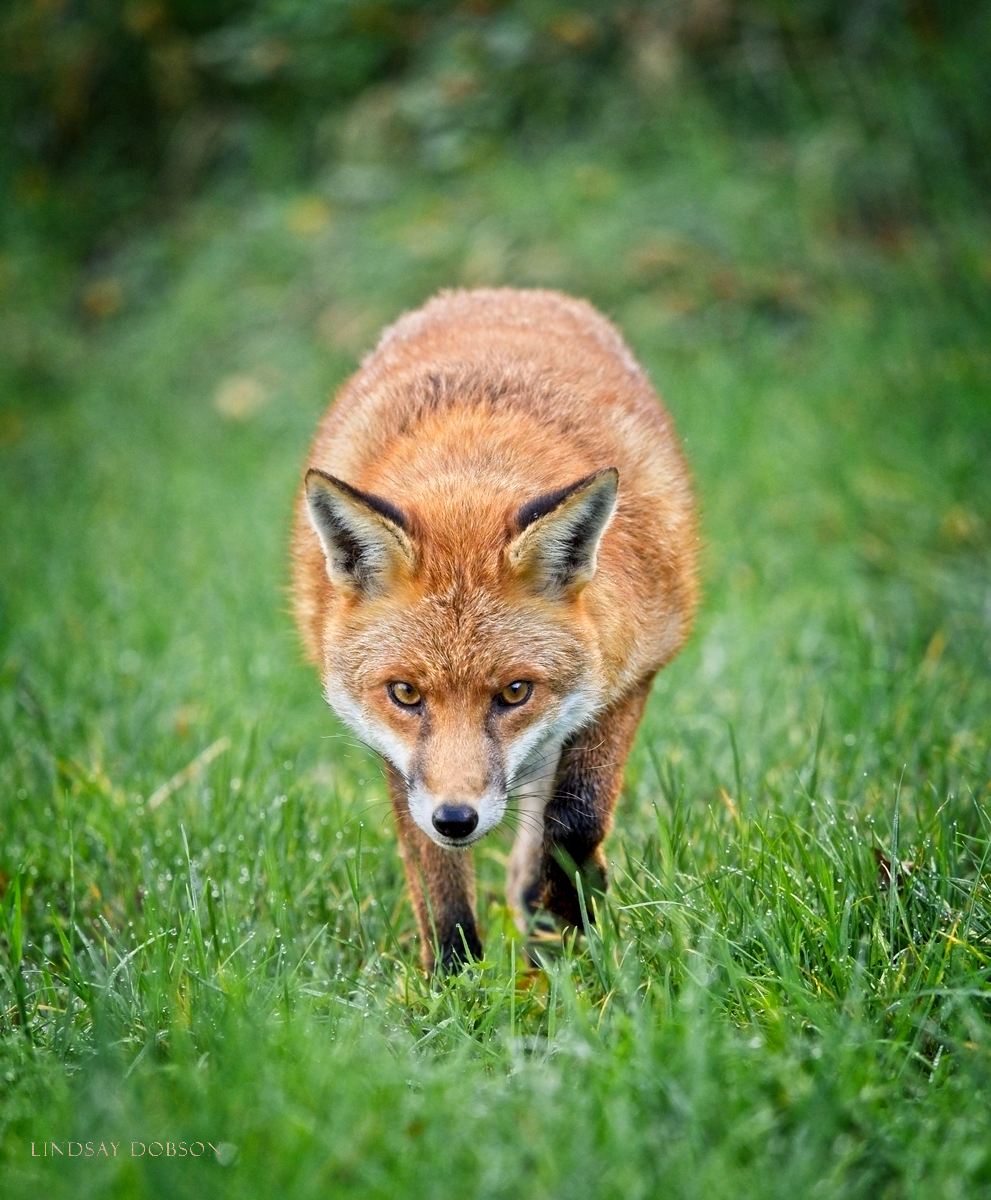
Olympus M Zuiko 40-150 f2.8 Sharpness
This is the real deal – the sharpness of this lens is out of this world. I mean it’s jaw dropping, edge to edge. I have sharp lenses, and I’ve spent a lot of years using Canon’s finest, but I’m going to put my head on the block and say that I think this is up with the best. Adding the teleconverter was another pleasant surprise, there was minimal degradation in sharpness (and I’ve conducted these tests at the extremes of each end of the focal range) which sets this device ahead of my Canon x1.4TC (MkI). I’m still getting really nice subject separation as well at f4, which will be your maximum aperture with the teleconverter mounted.
Do remember that sharpness involves a number of parameters – your shutter speed for a start. It needs to be appropriate to the speed of your subject and appropriate to your own handholding abilities. With animals I tend to make sure I set a very high shutter speed – even if the animal is static for a given shot it might suddenly engage in rapid activity which I will want to capture as it unfolds – those moments will be gone if you set your shutter speed only for static captures. Whatever system you use, don’t be afraid of cranking the ISO, there’s no way around that in anything other than perfect light, and in my opinion people are far too fussy about a small sprinkling of noise (which is rarely noticeable in print).
Olympus M Zuiko 40-150 f2.8 Focus Speed
It’s superfast on both of the cameras used in the test. Fast focus is essential for me because my subjects are rarely still, and catching the static moments seen in the pictures above took a degree of concentration – animals will sometimes only pause for a split second and I like to grab key moments as they happen. It’s also wonderfully accurate and better than the standard quality tele zooms I’ve been relying on so far. The autofocus slows down slightly in very dim light indoors, but not to the extent where it would bother you. This is quite a feat for a lens of this type.
The Bottom Line
So, will I be investing in one of these lenses? Well it looks like I’m going to have to – the quality of this piece is amazing. For professional work, if you’re printing big, this lens is going to give stunning results. And of course the fast aperture means we can offset the perceived noise disadvantage of Micro 4/3 sensor sizes. Yes, it is heavier than the other Micro 4/3 lenses and for that reason, as an arthritis sufferer, I’m not going to be carrying this lens around every day, I’ll stick to my fast primes for my portrait work. But for animals and nature this is a no-brainer. I’m already making a list of the bits and bobs I can put on eBay this weekend – this is certainly a lens worth saving up for and I must say it was a struggle giving it back at the end of the day.
Big thanks to Olympus (Claire and both Davids) and of course to the British Wildlife Centre. If you live within access of Surrey I highly recommend you pay a visit to the Centre, it’s absolutely lovely and you won’t need direct access to the enclosures in order to gain great pictures of the animals (they also run dedicated photography days if you want to get extra close to the furry and feathered residents).
And lastly, here is a 100% crop from the RAW files of the squirrel and cat, because I know there are one or two pixel peepers out there (ahem) on forums who are currently saying (you know who you are) that these photographs are meaningless at normal web viewing size. Another word about sharpness – there is more to it than a fabulous lens, just be aware of that when making your appraisals. I have a lot of experience and I know how to get the best out of my kit – that may not be the case for everyone so if you want a foolproof way of determining how sharp ‘your’ images are going to be, then the one common denominator will be ‘you’. Hence at the end of the day the very best way for you to determine if any piece of equipment meets your own requirements is to test it yourself – you’ll need to buy it, hire it, or borrow it (exactly as I do). For me these pictures are so sharp and detailed its ridiculous (once again there is no sharpening added other than the minimal default level mentioned earlier). The crop of the cat is an example with the teleconverter. ISO values are 1600 and 1250 respectively, and this doesn’t impact on the detail (I wanted very high shutter speeds because the squirrel in particular was incredibly active).


